Unfold Copyright ©1996, ©1997, ©1998, ©1999 By Doug Garmon
Email:
doug@ohioclimbers.org
mgarmon@kent.edu
- Introduction
- Read This NOW!
- Requirements
- Running ‘Unfold’
- Running ‘demo.bat’-- Using UNFOLD with Windows
- UNFOLD and Linux
- Running UNFOLD on a Macintosh
- Using UNFOLD
- Notable Fixes
- Errors & Bugs
- Notes
- To Do
UNFOLD 0.6 is Copyright © 1999 by Doug Garmon. All rights reserved.
Read LICENSE.txt for more detailed info. All rights are reserved. This license pertains only to the current version, 0.6
UNFOLD V0.6 executable is currently FREEWARE.
Restrictions:
- UNFOLD may not be distributed for profit. It may be distributed for the cost of media alone.
- UNFOLD may be used by amateur or commercial builders, but any plans sold or otherwise distributed MUST include a notice that UNFOLD was used in the production of said plans. A statement which satisfies the above restriction : "Produced using UNFOLD, Copyright ©1999 by Doug Garmon";
- UNFOLD must be distributed only as the original archive. No materials may be added or removed from the archive.
Introduction
Unfold is designed to input a set of points which define the
edges of a plank in 3D
coordinates, and to convert those plank shapes into a flattened,
2D form.
It should be easy to convert a traditional table of boat building
offsets into the required
input file format.
Please read the Notes section of this document before creating a new input file. Detailed information on bug fixes can be found in the separate NOTES file, packaged with the binary distribution.
UNFOLD does not attempt to create a "developable surface" using multi-conic sections--it was designed for converting existing boat offsets into stitch+tape plank patterns. By definition, a plywood boat design previously built IS developable. Also, as a small boat builder, I don't enjoy thinking "conically". Anyway, there are plenty of CAD programs out there already designed for that purpose.
Also, some of the data files, such as sphere.off, were created on a Linux box, which is a UNIXish environment. They have been saved as unix-style text, which will confuse editors such as Window's NOTEPAD. Try opening them in WORDPAD instead. UNFOLD itself doesn't care if the input is unix or dos text.
|
flattening boats. |
 |
|
(kinda looks like an 'f hole' on a violin, eh?) |
Before downloading UNFOLD, be sure you understand the nature of the beast:
UNFOLD is NOT a Windows program. Unfold is a command-line invoked program (like a DOS or Unix command), and no fancy interface exists. I have no plans to implement a GUI--the program complies and executes on multiple platform currently, and I would like to keep it that way. I might create some support programs with Windows interfaces, however.
UNFOLD is NOT a design environment. You cannot create the lines of a boat using UNFOLD. The design must already exist BEFORE you can use the program. It's purpose is only to convert surfaces described in 3D coordinates into a 2D surface, while retaining the original dimensions.
UNFOLD generates Postscript output. Unfolds does generate "graphic files" (see above "sphere"), however, they must be viewed or printed in other programs. "Postscript" is a Page Description Language designed so graphics can be displayed in a Device Independent way (the display will always take advantage of the relative resolution of each device). Postscript is used most often in publishing and typesetting, and is the professional format output by such programs as Quark and Pagemaker. Go to the section on Postscript Output for more info.
UNFOLD generates a Sample Intersect Table. This IS the flattened figure. Actually, this is what you need to transfer the data to a sheet of plywood. This file consists of a table of 2D points, which can be reproduced using a "baseline". Each point has two references--how far down (along) the baseline, and how far above the baseline. The points are always taken at right angles to the baseline, so use a T-square. Simply connect the points with a batten, and cut.
"Nothing happens when I run UNFOLD." Did you include the required .offset file at the command line? If so, look in your execution directory and see if the files untitled.ps and untitled.unf (or any files named using the DATAFILE or PSFILE cmds) were created (or overwritten). That's ALL that UNFOLD does--it processes the input, creates output files, then it exits. It's up to you to use the files it creates.
Unfold is now compiled using EGCS for win32, which is the Microsoft Windows version of the next generation GPP compiler, the Free Software Foundation's C++ compiler which comes with Linux, etc. UNFOLD should work (in the DOS prompt) in Windows 95/98 and Windows NT without any additions.
A version compiled with DJGPP now exists, and is usable on DOS only environments (also, see Macintosh section).
A Linux version is now available (actually the primary platform for UNFOLD is Linux).
To view or print the postscript output files, you will need a postscript printer, or the freeware postscript interpreter GHOSTSCRIPT. See section Displaying Postscript with Ghostscript for more info.
Running ‘Unfold’
Unfold must still be run from dos. To run under Windows, see
the section below-- Running ‘demo.bat’--
Using UNFOLD with Windows.
To use from DOS, find MS-DOS Prompt in the startup menu. Select it to activate DOS in a window. Change your current directory to wherever UNFOLD was unzipped, and invoke the program as follows:
unfold inputfilename

For example:
unfold batteau.off
Redirection of the standard output is no longer used for saving output files. If the output file names are not specified in the DATAFILE and PSFILE commands, the output defaults to:
- untitled.ps
- untitled.unf
The cmd line STDOUT will now be used only for status and error messages.
UNFOLD will now take multiple inputfiles for processing. NOTE: unless the DATAFILE and PSFILE directives are used, the last inputfile to be interpreted will overwrite the previous versions of "untitled.ps" and "untitled.unf" (there can be only one of each file).
For example:
unfold sheer.off garbd.off
Running ‘demo.bat’--
Using UNFOLD with Windows
“demo.bat” demonstrates how Unfold can be run from
Windows using a batch file. Simply
enter the dos input as above into a text file, and rename the
file “filename.bat”.
Double-clicking on the batch file in Windows Explorer will execute
the commands and
run Unfold.
After double-clicking “demo.bat”, a set of new output files will appear.
Unfold and Linux
Since Linux is the main development platform for UNFOLD, it's appropriate that a linux binary is now available. It's operation is functionally identical to the DOS use described above. Just use bash or the shell of your choice.
The same linux concerns apply as any other bin--if the current directory is not included in your PATH variable, bash won't find the executable. Either put the UNFOLD binary somewhere in your PATH, (like '/usr/bin/', or '/usr/local/bin/') , add the current directory to the PATH, or execute it like:
./unfold filename.off
Obviously, the execution permissions must be set correctly.
Linux X windows users have multiple options for viewing the postscript output, including ghostscript, ghostview, gv, and (in KDE) kghostview.
Running UNFOLD on a Macintosh
Larry Geib has reported success using a dos emulator for Macintosh:
"I'm using REALPC software emulator, which has MSDOS 6.22 included with it. I just followed your instructions and all went well. The only problem came when I unzipped the file, which I did with a Mac program called DROPSTUFF. the files came out as Simpletext (Mac) text files. I used ResEdit 2.1 to open the file info and change the file TYPE to TEXT and CREATOR to PCXT."
"I downloaded GHOSTSCRIPT for the Mac, and it worked great, I was then able to move the resulting PICT file to several Mac programs for printing full sized templates. Clarisworks, Macdraw, Cadintosh, and MacCad all gave me good results with no problems."
Note: You must use the DOS only (DJGPP) version of UNFOLD with a MAC, as the other binary requires MSWindow (even though it does not run under Windows).
Sorry, Mac users, I still have no plans for a MacOS version--I like Macs (I own a couple of older 68K machines), but I don't have a decent development environment and can't justify buying a commercial compiler for a single freeware project.
|
|
Input .off Files
Unfold requires an input file which represents one ‘plank’
of a stitch & tape boat design. I
use .off (for ‘offset’) as a naming convention for
my input files, but it is not neccesary.
The input file is composed of the following commands:
CMD <required argument> [optional argument]
Input types:
- float floating point (3.2)
- int integer (5)
- boolean true or false, text (TRUE)
- str a text str (SAMP)
- VERT <float> <float> <float> [str (SAMP)]
- SAMP <float>
- INREM <float>
- SCALE <float>
- METRIC
- ENGLISH
- FLIPHORIZ
- ROTATE <float>
- DATAFILE <name>
- PSFILE <name>
- SHOWPAGE
- TURNOFF <str>
- SORT
- CURVEFIT <int> <int> [int [boolean [boolean [int] ] ] ]
- #
Commands are now case-insensitive. "VERT", "vert" and "vErT" are all legal command inputs.
VERT Add a three-number (3d) vertex to the project.
Usage:
VERT <width from base>
<height above base> <Length along base> [SAMP]
Just as a table of offsets must be organized in a logical,
sequential order, so must the
vertices in Unfold. The vertices are sorted by their length along
the centerline (think
‘stations’ or vertical plane ‘slices’ of
the boat), and top-to-bottom at each ‘slice’. Essentially,
VERTs are a list of points, alternating along each side of a
twisted ribbon in 3D space.
Numerical input is a real number (float, i.e. 1.42534), so if input is inches they must first be converted to decimal format. If measure is metric (centimeters, etc) then input is easier. If ENGLISH cmd is included (default), the output tables will list both inches in decimal format and conversion to feet/inches.
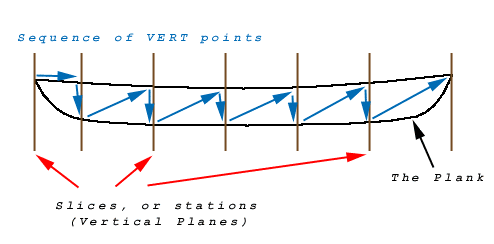
The sequence order (priority) of VERT points is as follows (using a sheer plank as an example):
Begin at one end of the boat, usually the bow.
- Stations (vertical slices, planes) have the highest priority.
- First VERT is where the plane crosses the hull at the sheer.
- Second Vert is the plane-crossing at the chine.
- (think TOP-TO-BOTTOM priority, always choose the uppermost point first at any slice)
- Move to the next station.
A station may cross the hull at only one point--if the bow or stern comes to a sharp point. This is O.K., if the single crossings occur at the start or end of the input file.
The VERTs from a sheer plank of a double-ended boat with 7
‘slices’ or stations
(including the boat’s ends as stations) would be listed
in the input file in the following
order:
        Station #
1   2   3   4   5   6     7
|   |   |   |   |   |     |   <-- slices


1---2---4---6---8---10---12  <--VERTs at each station
 \                      /
  \                    / <-- the plank
   \                  /
    3---5---7---9---11
Adding the SAMP argument after the vertex forces Unfold to
add a ‘sample’ at
that vertex point. Very useful if the vertex marks a point such
as a stem/keel junction, when
that junction is a pronounced angle. See ‘SAMP’ for
more information.
SAMP Add an additional ‘sample’ to project.
Usage:
SAMP <point along baseline>
A sample is a point along the baseline where a perpendicular
line is drawn across the
unfolded figure. Where the line crosses the figure, that point
is added to the output of indexed reference points. Using the
locations of these points, the sample
intersect points, the figure can be translated to
other media, such as plywood.
Use SAMP to add resolution to the final figure at places where the standard INCREM is insufficient, such as the stems, or anywhere the curvature changes rapidly.
The indexed reference points in the ps drawing correspond to the index numbers in the .unf file.
INCREM Change default sample increment.
Usage:
INCREM <positive number>
Increm controls the interval at which UNFOLD creates the standard set of sample lines which are used to produce the sample intersect points. These intersect points can then be used to transfer the drawing to other media.
By using the SAMP command, you can take more samples of the figure at specific points along the baseline, such as the rapidly changing curves at the stems of a boat. This avoids cluttering the final figure with too much unneccesary data. INCREM begins at zero, and UNFOLD automatically adds a sample point at the end of the figure.
The default is 12.0 units (1 foot, in ENGLISH mode, 12.0 cm
in METRIC mode). You
will probably want to change the sample increment in METRIC mode
to about 30.0 (cm).
Usage:
SCALE <positive number>
Default scaler is 3.5 . ‘Unfold’ does not scale
drawing automatically, because it
would be impossible to compare output from different planks on
the same design. Use this
command to size a set of draws if they are too large or too small.
METRIC Change input units to centimeters.
Usage:
METRIC
No conversion is done. Assumes data was entered in metric (decimal format-- i.e. 1.3242). Since metric measures are interrelated, it doesn't matter if input is millimeters, centimeters or kilometers!
Suppresses the feet/inches listing on the printout.
ENGLISH Change input units to inches.
Usage:
ENGLISH
No conversion is done. Assumes data was entered in inches (decimal format-- i.e. 1.3242).
FLIPHORIZ Flip the drawing horizontally.
Usage:
FLIPHORIZ
This flips the final figure relative to the baseline. UNFOLD
will orient the figure differently
if the first section of VERT points has a single point, rather
than two points. Use this
command to switch the figure's direction.
Flipping the image is useful if the plywood can be used more efficiently by orienting the image differently. Also, any remaining factory edges on a sheet might be utilized better by flipping the figure.
Usage:
ROTATE <float>
Default rotation angle is 0.0 . ‘Unfold’ will calculate an angle based on the first and last points in any figure, and draw the figure at that angle relative to the baseline. However, that drawing might not afford the most efficient use of plywood. Use ROTATE to adjust the drawing angle.
NOTE: ROTATE works in absolute coordinates, so flipping a drawing with FLIPHORIZ will reverse the angle of rotation. Just change the sign on the input number (i.e., 5.5 to -5.5).
DATAFILE Save the .unf information to a file
Usage:
DATAFILE <filename>
The .unf file includes the sample intersect table.
Use .txt instead of .unf if you want to view the file with NOTEPAD in MS Windows, i.e. DATAFILE myfile.txt
PSFILE Save the .ps information (drawn figure) to a file
Usage:
PSFILE <filename>
Add .ps to the end of the filename, and Windows will be able to recognize the file as being postscript. If you have GHOSTSCRIPT (and GSVIEW) installed, the file will load and display when double-clicked.
SHOWPAGE Append a showpage operator to the end of the postscript document.
Usage:
SHOWPAGE
Postscript printers need a showpage operator to dump the page. AI documents don't usually include one. You can force the addition of showpage with this command.
Some versions of GSVIEW need a showpage to reset the display after a draw, or the magnification cannot be changed. Printing may also be effected.
TURNOFF Turns off parts of the postscript output
Usage:
TURNOFF <options>
Blanks portions of the postscript output file.
|
|
Turns Off: |
|
|
All options are ON by default. Use TURNOFF to filter out any unwanted display elements.
Example:
TURNOFF BBOX BETA INNERLINES
Notes:
- Leaving VERTS on is only useful when the first vert in a CURVEFIT segment is needed. Once you discover the VERT #, turn it off, as VERTS will really clutter the output.
- BETA, which used to be impossible to turn off, has been REMOVED from the list. You may include it in a TURNOFF, but it does nothing.
SORT Sort the input points using Length, Height, Width priority
Usage:
SORT
The SORT command should help those who have had trouble entering data. When you tell UNFOLD to SORT, the order of the input VERTs doesn't matter -- UNFOLD will will sort the data appropriately.
| SORT will only function correctly if the VERTs are taken in pairs at each plane (station). In other words, if you take a VERT point at one side of a plank, then another VERT point MUST be taken at the same LENGTH ALONG BASELINE, (the plane which intersects the 3D object, the 'slice' or 'vertical plane' referred to in the SAMP illustration). |
|
The points DO NOT need to be listed sequentially, as the sort function will take care of that.
Because of these limitations, SORT will not work on data in which all the data pairs were not sampled at such planes (planes perpendicular to a line, and which don't intersect). UNFOLD itself can handle data which is sampled at any vertex in 3D space--It just needs the vertex list to be sequentially ordered. Include the SORT command in "sphere.off" and the output will be unusable, because the sequence is not ordered along a linear axis.
Boat offsets, however, should be work with the SORT command, as offsets are taken at station molds (which are non-intersecting planes--generally--transoms are an exception).
A input file, "unordered.off" is included which uses the SORT command (and produces the output "sorted.ps" and "sorted.unf"). If the SORT command is removed, the figure is hopelessly garbled.
CURVEFIT Add new VERT points to figure using interpolation (artificial data).
Usage:
CURVEFIT <start vert>
<# of segments> [# of inserted segs [bool A [bool B [force]
] ] ]
- start vert: vertex where curve fitting begins
- # of segments: number of segments (VERTS) to curve fit-- must be 3 or greater
- # of inserted segs: number of curve fitted segments (VERTS) to insert between each original segment (default = 1)
- bool A: true or false--curve fit or leave straight segment originating from start vert (default = true)
- bool B: true or false--curve fit or leave straight segment opposite (default = true)
- force: if the offset for the opposite side fails, force with 1 or -1
CURVEFIT adds new, artificially generated points along the curve to make sampling the figure more closely approximate "reality" (especially if the original verts are only taken every 2-3 feet).
Since the points on the flattened figure are connected by lines, sampling the figure near an original vert would be quite accurate, but sampling halfway between two verts which are 3 feet apart could be quite inaccurate, if there is a large amount of curvature present in that segment. CURVEFIT attempts to address this by inserting interpolated points between existing verts in the figure.
CURVEFIT will abort if the input is in error, i.e., if the # segments overruns the end of the figure, or the start vert is outside the range of the figure, etc.
- A: No curve fitting.
- B: Fitted, start at 0 vert, 6 segments fitted, 8 segments inserted, fit both sides:
CURVEFIT 0 6 8- C: Fitted, start at 3 vert, 3 segments fitted, 8 segments inserted, fit both sides:
CURVEFIT 3 3 8- D: Fitted, start at 1 vert, 3 segments fitted, 10 segments inserted, start side fitted, opposite not (close up to compare curved vs straight sections):
CURVEFIT 1 3 10 true false - B: Fitted, start at 0 vert, 6 segments fitted, 8 segments inserted, fit both sides:
Invoking CURVEFIT multiple times
The CURVEFIT cmd may be called more than once in an input file, but the effects are cumulative. In other words, the previous invocation will increase the VERT count, so any subsequent call will use the additional verts as well as the original ones. You can even overlap CURVEFIT calls, in effect adding resolution only to smaller areas in the figure.
However, the same limitations regarding # of segments, etc., apply.
To use CURVEFIT multiple times, first make sure "verts" is not part of the TURNOFF cmd (you want to see the verts). Run UNFOLD with the first CURVEFIT cmd added in the input file. Use the VERT numbers as displayed as a reference, and add each CURVEFIT cmd relative to the new sequence.
Forcing the offset
The CURVEFIT algorithm can fail to find the correct offset for the corresponding point on the opposite side (since the input is sequential, UNFOLD must guess). If the fitted sections seem to be skewed incorrectly, the offset amount can be forced by adding a 1 or a -1 at the end of the CURVEFIT cmd (to force, you must include all preceding optional inputs).
Example of CURVEFIT with forced offset:
CURVEFIT 1 3 10 true false -1
The force amount must be 1 or -1. If neither of these corrects the offset, then the input data is not in matched pairs, and should be considered suspect.
A final note on curve fitting
A caveat: curve fitting really works but it cannot read minds, AND it is essentially artificial data. It will fit the curve using the data you provide. Equally distributed verts are important to CURVEFIT. In other word: garbage in, garbage out.
Usage:
# [any text can go here]
The "#" should be the first char on the line. Currently, most additional comments which fall after any commands will probably be ignored, but I do not promise this will always be the case.
# a demo offset file for Doug Garmon's UNFOLD program
# See documentation file for command list
# set output files
DATAFILE table.unf
PSFILE plank.ps
SHOWPAGE
# extra samples
SAMP 6.0
SAMP 18.0
SAMP 30.0
SAMP 246
# various adjustments
INCREM 12.0
ENGLISH
SCALE 3.5
FLIPHORIZ
# verts on the plank
# two verts include cmd to generate an additional sample
VERT 0.0 27.5 0.0
VERT 10.75 22.875 36.0
VERT 0.0 3.0 36.0 SAMP
VERT 16.05 20.25 60.0
VERT 7.375 1.875 60.0
VERT 20.75 17.38 96.0
VERT 14.0 0.625 96.0
VERT 22.125 16.375 132.0
VERT 16.375 0.0 132.0
VERT 20.05 17.25 168.0
VERT 14.875 0.625 168.0
VERT 13.75 19.5 204.0
VERT 7.875 1.75 204.0
VERT 6.75 21.5 228.0
VERT 0.0 3.0 228.0 SAMP
VERT 0.0 23.0 247.0
Unfold creates an output file in ‘postscript’ format.
Postscript is a ‘page description
language’, designed by Adobe and used in many printers.
The previous versions of UNFOLD
included the sample intersect
table in the PS file.
This is no longer the case (See .UNF output section).
The output file name should include “.ps” at the end. This will help Windows recognize the file as postscript, if you have Ghostscript installed (see below).
Use the PSFILE command to specify the filename. If PSFILE is not included, the default file name is "untitled.ps".
Some programs, such as Adobe Photoshop, allow you to input .ps files directly (where they are converted to bitmap format).
Displaying Postscript with Ghostscript
A postscript file can be dumped directly into a postscript
printer. More conveniently, a .ps
file can be displayed using GHOSTSCRIPT and GSVIEW,
which are a public domain
postscript interpreter, and a postscript viewer (which uses ghostscript).
Both GHOSTSCRIPT and GSVIEW are FREE. A
ps file can also be printed and dumped into a variety of graphic
file formats (tiff, pcx, etc.) directly from GSVIEW.
NOTE: GSVIEW currently needs a 'showpage' operator, not to display a page, but to change magnification, or to print. A 'showpage' operator can be forced into the output file with the SHOWPAGE cmd.
Get the latest versions at the Official Home of Ghostscript, Ghostview and GSview. You can also find GHOSTSCRIPT and GSVIEW on many online file repositories (such as www.download.com, or shareware.com). It is free to download.
When GHOSTSCRIPT and GSVIEW are installed under Windows, double-clicking
on a
postscript file (with .ps attached, such as file.ps) will automatically
load that file into
GSVIEW, and allow both viewing and printing on a non-postscript
printer.
IMHO, I think everyone should have Ghostscript installed on their computers. Adobe's Postscript language used to add $300 to the cost of laser printers. It's one of the most interesting languages and enables almost anyone to create superb typesetting on a home printer (plus it allows very accurate proofing, pre-professional typesetting). It is still the route used for almost all offset printing (books, magazines, etc).
The .unf, or unfold file includes the sample intersect table which lists the locations of each sample intersect point. The drawn figure can be reproduced on another surface by drawing a baseline and using a T-square or carpenters square (or measure using a second axis) to transfer the points. This is similar to using a grid, but much more accurate.
NOTE: Add the suffix .TXT to your .unf files and they will load easily in MS Windows. Use the DATAFILE command: DATAFILE myfigure.txt
The file format is simple:
- Index numbers, which correspond to the #s on the drawn figure
- Where the point falls along the baseline
- In units
- In Feet/Inches
- How far the points is above the baseline
- In Units
- In Feet/Inches
Once transferred, the points can be connected using a batten or other flexible drawing tool. If the curature produced is insufficient, set the INCREM to a lower value so that more samples are taken of the unfolded figure.
Where an .unf file lists feet & inches, the max listed accuracy is 1/16'', with 1/32 adjustments tacked on as signs (+, -). So, 1' 1 1/2+'' is actually 1 foot, 1 and 17/32 inches. This differs from traditional offsets in that their max listed accuracy is 1/8'' (and +/- denote 1/16'').
In fact, a figure can be reproduced without the .ps drawing at all. Only this file is neccesary to create a usable shape.
       UNFOLD: proj: t1.off unf:untitled.unf
INDEX      Length along Baseline         Height above Baseline
          Units (dec)      Ft/In        Units (dec)     Ft/In
---------------------------------------------------------------------
   0:      0.0000     0'  0 "            0.9435           15/16"
   1:     12.0000     1'  0 "            0.8001           13/16"
   2:     12.0000     1'  0 "            8.3338     0'  8 3/8-"
   3:     24.0000     2'  0 "            0.6567           5/8+"
   4:     24.0000     2'  0 "           15.2673     1'  3 1/4+"
   5:     36.0000     3'  0 "            0.5132           1/2"
   6:     36.0000     3'  0 "           22.2009     1' 10 3/16"
   7:     48.0000     4'  0 "            0.5484           9/16"
   8:     48.0000     4'  0 "           22.1924     1' 10 3/16"
   9:     60.0000     5'  0 "            0.6162           5/8"
  10:     60.0000     5'  0 "           21.1697     1'  9 1/8+"
  11:     72.0000     6'  0 "            0.7820           3/4+"
  12:     72.0000     6'  0 "           20.5195     1'  8 1/2+"
  13:     84.0000     7'  0 "            0.9746           15/16+"
  14:     84.0000     7'  0 "           19.9708     1'  7 15/16+"
  15:     96.0000     8'  0 "            1.1672     0'  1 1/8+"
  16:     96.0000     8'  0 "           19.4222     1'  7 7/16"
  17:    108.0000     9'  0 "            1.2318     0'  1 1/4-"
  18:    108.0000     9'  0 "           19.1205     1'  7 1/8"
  19:    120.0000    10'  0 "            1.2542     0'  1 1/4"
  20:    120.0000    10'  0 "           18.9071     1'  6 7/8+"
  21:    132.0000    11'  0 "            1.2766     0'  1 1/4+"
  22:    132.0000    11'  0 "           18.6937     1'  6 11/16"
  23:    144.0000    12'  0 "            1.1373     0'  1 1/8"
  24:    144.0000    12'  0 "           18.5083     1'  6 1/2"
  25:    156.0000    13'  0 "            0.9435           15/16"
  26:    156.0000    13'  0 "           18.3334     1'  6 3/8-"
  27:    168.0000    14'  0 "            0.7497           3/4"
  28:    168.0000    14'  0 "           18.1584     1'  6 1/8+"
  29:    180.0000    15'  0 "            0.5401           1/2+"
  30:    180.0000    15'  0 "           18.2601     1'  6 1/4"
  31:    192.0000    16'  0 "            0.3249           5/16"
  32:    192.0000    16'  0 "           18.4655     1'  6 1/2-"
  33:    204.0000    17'  0 "            0.1098           1/8"
  34:    204.0000    17'  0 "           18.6710     1'  6 5/8+"
  35:    216.0000    18'  0 "            0.0291           1/16-"
  36:    216.0000    18'  0 "           19.0408     1'  7 1/16-"
  37:    228.0000    19'  0 "            0.0083     0'  0 "
  38:    228.0000    19'  0 "           19.4915     1'  7 1/2"
  39:    240.0000    20'  0 "            0.1585           1/8+"
  40:    240.0000    20'  0 "           13.2597     1'  1 1/4"
  41:    252.9937    21'  0 15/16+"      0.4439           7/16"
  42:      6.0000     0'  6 "            0.8718           7/8"
  43:      6.0000     0'  6 "            4.8670     0'  4 7/8"
  44:     18.0000     1'  6 "            0.7284           3/4-"
  45:     18.0000     1'  6 "           11.8006     0' 11 13/16"
  46:     30.0000     2'  6 "            0.5849           5/8-"
  47:     30.0000     2'  6 "           18.7341     1'  6 3/4-"
  48:    246.0000    20'  6 "            0.2903           1/4+"
  49:    246.0000    20'  6 "            7.5640     0'  7 9/16"
  50:     37.5298     3'  1 1/2+"        0.4950           1/2"
  51:     37.5298     3'  1 1/2+"       23.0848     1' 11 1/8-"
  52:    233.2284    19'  5 1/4-"       19.6878     1'  7 11/16"
  53:    233.2284    19'  5 1/4-"        0.0099     0'  0 "
Understanding the Output Drawing
This drawing illustrates each component of the ps output. This should also help explain the TURNOFF command. ONLY the figure itself cannot be turned off, or blanked.
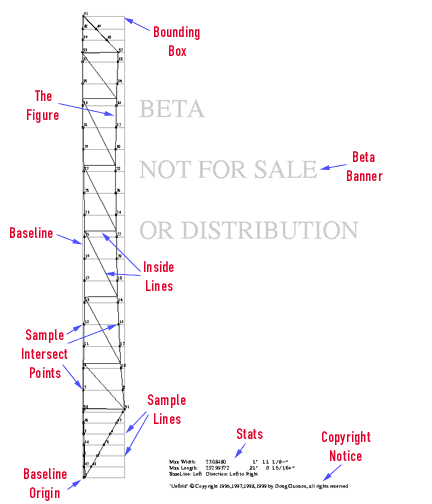
Reading locations of Sample Intersect Points:
| ^
| |
| | Length along baseline
| |
|
| -------> Height above baseline
0,0---------^
|
The baseline (the left-hand vertical axis)
The baseline starts at the bottom left corner and runs vertically
up the page.
Statistics includes:
- Maximum length of the plank.
- Maximum width of the plank.
1)UNFOLD is much more stable.
2) Duplicate intersection points have been eliminated (in most cases -- you could generate duplicate intersections by creating identical SAMP directives-- so don't do that).
3) UNFOLD no longer chokes on 'null triangles', which makes it more tolerant of 'suspect' input data.
Fixes:
1) TURNOFF INNERLINES command would drop the last perimeter line in figures. This is now repaired.
Errors + bugs
1) Index numbers can overwrite other index numbers on the plank
drawing, if the samples are very close. (see note #5, below).
2) Very few error messages are generated--UNFOLD usually just ignores something it doesn't understand. I realize that error msgs would aid in producing useful input files, and I will add more in the future.
Notes
1) If a sample line crosses a line on the figure which is parallel
to the sample, it produces
an intersection at only one point, the point where the two lines
first cross. This is not
really a bug, because the alternative would be to allow an infinite
number of intersections
for two such lines. That would be bad.
If this happens, try adding another sample very close to the
offending sample, say .005
units away. This will be of sufficient accuracy for any boat
building problem.
2) The comment line code ‘#’ should be the first character on the line.
3) Sections in a plank which have a large amount of curvature
(such as stems) will need to
be sampled every 3 or 4 inches. To assure a close match, other
planks which share edges
with the first plank also should be sampled at the same positions
(planes), even if they do
not have the corresponding curvature. Curve fitting should help
minimize this problem.
4) UNFOLD no longer expires, or times out after a certain period. I believe it is stable enough to use.
5) I have added a crude, but effective method which prevents index numbers from overlapping on the .ps output. Currently this will only be applied if the viewing of VERTS is also active (the two together tend to get confusing).
6) VERTS and INTERSECTS are currently shown in blue and red, respectively.
To Do
1) Add a log file for errors and statistics.
2) Add plotter (HPGL) and 3D cad (autocad--DXF) support.
3) Implement sampling on the other axis (sample lines parallel to the baseline), for figures which are not long and narrow (non-boat related objects). This would result in a sampling grid.
4) I have many more additions in mind.